

California State University, Sacramento’s
PC2
Version 7.4
Contestant’s Guide
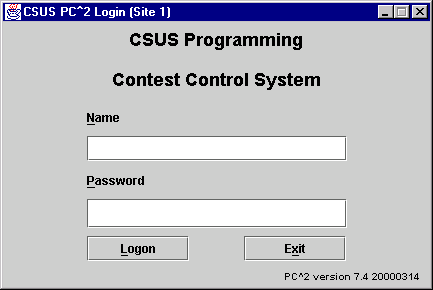
This guide is intended to familiarize you with the process of submitting programs to Contest Judges using the PC2 ("P-C-Squared") Programming Contest Control system. Starting PC2 will bring up the PC2 login screen, shown below:
To login to PC2, click once on the Name box on the login screen, enter your assigned team ID, press the TAB key or click on the Password box, then enter your assigned password. Your team ID will be of the form teamxx, where xx is your assigned team number (for example, "team3" or "team12"). After entering your team name and password, click on the Logon button.
Submitting a Program to the Judges

Clicking on the Runs tab near the top of the screen displays the Run Submission screen, which is shown above.
Clicking in the Problem field will display a list of the contest problems; choose the problem for which you wish to submit a program ("run") to the Judges (in the example, a problem named "Bowling for Buzzards" has been chosen).
Clicking in the Language field will display a list of the programming languages allowed in the contest; choose the language used by the program that you wish to submit to the Judges (in the example, Java has been chosen).
To submit a program to the Judges, you must specify the name of the file containing your main program. Click on the Select button to invoke the "File Dialog" which lets you locate and select your main file. The Dialog lets you automatically navigate to the correct path and file location.
If your program consists of more than one file, you must enter the additional file names in the Additional Files box. Click the Add button to invoke the dialog which lets you locate and select your additional files; select a file in the box and click the Remove button to remove a previously-selected file. Important: you must specify the name of your main program file in the Main File field, not in the Additional Files box!
NOTE: select only source code files for submission to the Judges. Do not submit data files or executable files.
Once you have selected the problem, language, and file(s) to be submitted to the Judges, you should click the Test button. This will compile and execute your program on your machine, using an environment as nearly identical to that of the Judges as possible (except that it will use your data file, not the Judge’s data file). The reason for making a Test Run before submitting your program to the Judges is to ensure that your program operates the way you intend it to operate when the Judges view it. Test Runs do not count against your score in the contest, but they may save you a lot of time and penalty points by identifying environment problems before you submit the program to the Judges.
NOTE: prior to making a Test Run, you must insure that the data file for the program exists, in the same directory as the program file(s).
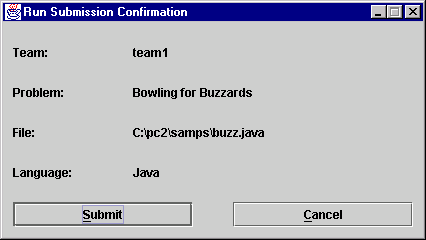
Once you are satisfied with the results of your Test Run, click the Submit button. The following confirmation will appear, click on Submit to confirm the submission and send the run to the judges.
If you press the submit button, you will receive a confirmation message on your screen, similar to the example shown below.
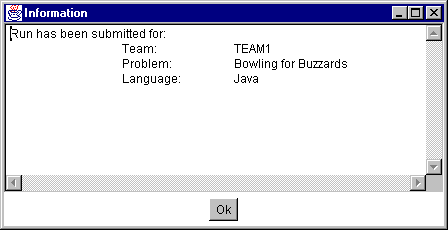
After reading the submission confirmation message, click the OK button to delete it. NOTE: the confirmation only indicates that the Judges have received your submission, not that it has been judged. You will receive an additional message, including an indication of whether the submitted program correctly solved the problem or not, once the Judges finish judging the program. The time it takes for this varies depending on how busy the Judges are at the time you submit the program.
To view the status of runs you have submitted, click the View button. This will invoke an operating-system specific text editor to produce a display similar to the one shown below.
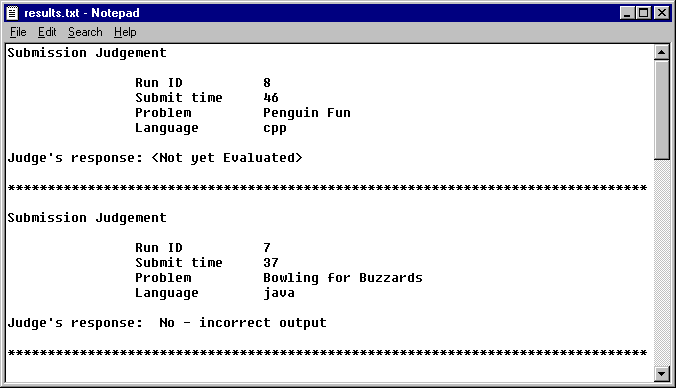
Note that in this example, two runs (for different problems and with different submission times) have been submitted by the Team; only one of the runs has been evaluated by the Judges. The submission time is in "minutes since the start of the contest".
When you are finished viewing the run submission status, use the Window-closing "X", the Fileà Quit menu, or similar operation to close the display. Note that the run status display is not automatically updated while the display window is open; it must be closed and reopened to view additional (new run) information.
Clarification Requests
If you feel that one of the problem statements is ambiguous, you may submit a "Clarification Request" to the Judges. To submit a Clarification Request, click the Clarifications tab near the top of the Main screen. This will bring up the following display:
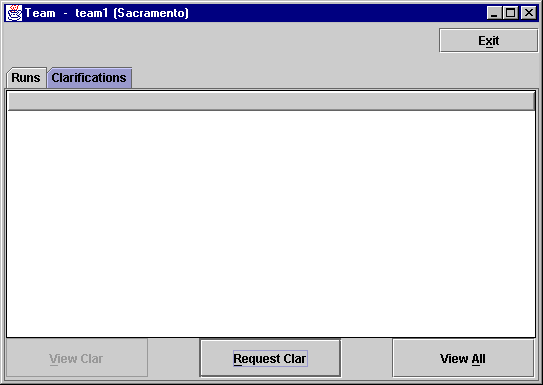
If the Judges have previously sent any Clarification Responses to your team (for example, due to a Clarification Request submitted by some other team), the responses will be listed one per row in the middle of this display. To view the text of a response, click on the corresponding row to select it, then click the View Clar button.
To send a new Clarification Request to the Judges, click the Request Clar button. This will produce a display similar to the following:
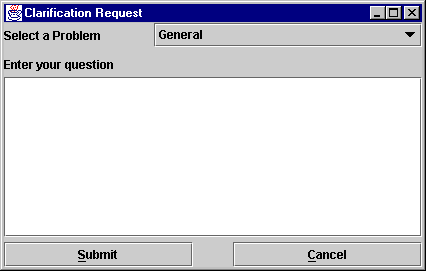
Click on the Select A Problem field to select the problem about which you wish a clarification, then click in the large text area in the middle. Type the text of your question, then click the Submit button to send the Clarification Request to the Judges. When the Judges respond (which may take a while, depending on how busy they are and on the nature of your Clarification Request), you will receive an automatic message displayed at your machine similar to the automatic response messages for submitted runs.
To view the status of Clarification Requests you have submitted, click the View All button on the Clarifications screen. This will produce a text editor display, similar to the one shown above for run submission status, showing all the Clarification Requests you have submitted along with the Judge’s response (if there is one yet).
Exiting PC2
The Exit button shuts down PC2 on your machine. It does not affect the status of runs and/or clarification requests previously submitted. Note however that automatic notification of receipt of submitted runs and of Judge’s responses to runs and Clarification Requests are disabled (not queued) when PC2 is not running; you must be logged at the time an automatic response is generated in order to receive it.